2018-01-30

リンクカード(ブログカード)を作るブックマークレット

リンクの見栄えを良くしたくて、以下のようなリンクカード(ブログカード)を探していました。

  1. 外部サービスに依存しない。(サービスの継続性の問題とパフォーマンスの点から)
  2. OGP (Open Graph Protocol) に対応していないサイトへのリンクはimagedescriptionを無理に表示しない。(関係のない画像やコンテンツが表示されることがあるので)
  3. 仕様が開示されている。(カスタマイズ可能)
  4. StackEdit の Markdownで利用可能。(シンプルなHTMLであること)

なかなか良いものが見つからず、<blockquote> で代用したりしていたのですが、以下のサイトを見つけました。

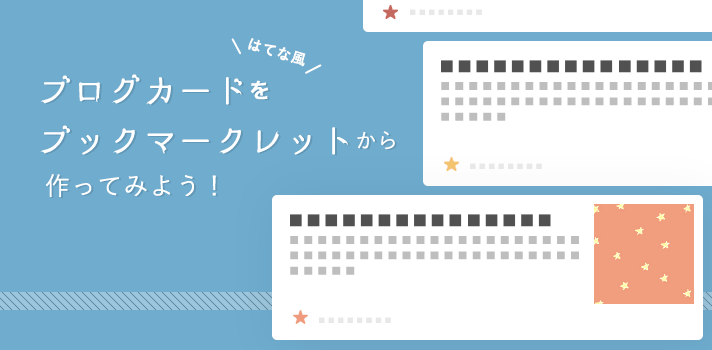
はてな風のブログカードをブックマークレットから作ってみよう! | 株式会社グランフェアズ

こんにちは、めぐたんです。 ブログを書いていると、参考記事や過去に書いた記事など別ページへのリンクを貼る機会が何かと多くあります。…

 (これはリンク先のブックマークレットで作ったリンクカードです。)

詳しくはリンク先を見ていただければ分かるのですが、外部サービスへの依存がほとんどなく(favicon 表示のみ)、そのため表示も高速です。

画像も og:img のみの表示です。画像がない場合も違和感のないデザインです。

ブックマークレット(JavaScript)ですので使いやすくカスタマイズも可能です。

また、使用しているタグも <div> のみですので、ブックマークレットから出力された HTML をそのまま StackEdit に貼り付けて使うことができます。

カスタマイズ

そのままでも充分使えるのですが、ブックマークレットの JavaScript を少しカスタマイズしてみます。

タイトル

obj.title = $('title').text();

でタイトルを取得しているのですが、document.title 以外に title 要素を使ったものが引っかかることがある(Qiitaなど)ので、

obj.title = document.title;

にしておきます。

テキスト部分

'<p>' + obj.desc + '</p>'

<meta name ="description" content=""> の内容を表示しているのですが、description がないサイトへのリンクだと、undefinedと表示されてしまいます。undefined の場合、自分で説明を上書きすれば良いのですが、以下のようにしてundefined を一旦消すことにします。

'<p>' + (obj.desc || '') + '</p>'

リンク

私の場合、内部リンクは別ウィンドウで開きたくないので、target="_blank" は消しておきます。(テキスト部分と画像部分の2箇所。)

URL

URL とホスト名は canonical 属性の設定があれば、そちらを使うようにします。

obj.url = document.URL;
obj.domain = location.host;

obj.url = $('link[rel=canonical]').attr('href') || document.URL;
var m = obj.url.match(/^https?:\/\/([^/]+)/);
obj.domain = m[1];

に変更します。

favicon

favicon は Google の API を使って取得しているのですが、Google は http / https 間の接続を認めていないので、"http://www.google.com/""//www.google.com/"に変更しておきます。

CSS

CSSも少しだけいじりました。faviconpadding が継承されていたので 0 をセットしたのと、favicon 右のドメインが下付きになっていたので、vertical-align: middle; を追加しました。

.blogCardFooter a img {
  margin-right: 5px;
  padding: 0;
  vertical-align: middle;
}

修正後のブックマークレット

ブログカード


株式会社グランフェアズ様、とても役立つ情報ありがとうございました。

2018-01-19

oo4oからADOへの変換 (7) Adapterクラスの作成(ADOでパラメータの名前によるバインドを可能にする)

移行方針について

oo4o から ADO へ移行する場合、大きく二つの方針が考えられると思います。
  1. 既存コードに手に入れず、oo4o のインタフェースを実装した ADO(ADO.NET)のラッパークラスを作成する。
  2. 全面的に ADO(ADO.NET)に書き換える。
まず、手っ取り早く (1) を検討したくなります。既存コードをそのまま利用できるのですから。しかし、今後もそのコードを継続して使用する場合、廃止された仕様に縛られ続けることにもなります。また、ADO とoo4o の仕様の差は大きく、 oo4o のインタフェースを完全に実装したラッパークラスの作成は困難です。
かといって、(2) の場合は書き換えに要する時間と費用の問題があります。oo4o と ADO の仕様の差は大きく書き換えも単純ではありません。(コンバータの作成を考えましたが、文法が大きく異なるため中途半端なものにならざるを得ません。)

では、どうするのか

移行に関係なく、データプロバイダの API を素のまま使わずデータベースアクセス用の共通クラスや関数を作成して手続きを単純化することは、よくある話ですし、望ましいことです。
その共通クラスの作成の際、oo4o の仕様を織り込むことで移行コストを抑えつつ、メンテナンス性も維持することを考えてみたいと思います。

ADO ラッパー(Adapter)クラスの作成

以下のような方針で ADO のラッパークラスを作成してみます。
  • 単一クラスとする。( Excel や Access のファイルに簡単に織り込めるのが望ましい。)
  • oo4o の OraSession、OraDatabase のインタフェースを極力実装する。
  • OraDynaset は対象外(ADO.Recordset に書き換える。)
  • Oracle のデータ型を使えるようにする。
  • 「名前によるバインド」を ADO でも可能にする。
クラス名は OraAdapter とします。
OraAdapter

使用例

OraAdapter クラスを使って Oracle® Objects for OLE開発者ガイドの OraParametersコレクション Addメソッド の例を書き換えてみます。
Sub Form_Load()

'Declare variables
'Dim OraSession As OraSession
'Dim OraDatabase As OraDatabase
  Dim OraDatabase As OraAdapter

'Create the OraSession Object.
'Set OraSession = CreateObject("OracleInProcServer.XOraSession")
  Set OraDatabase = New OraAdapter

'Create the OraDatabase Object.
'Set OraDatabase = OraSession.OpenDatabase("ExampleDb", "scott/tiger", 0&)
  OraDatabase.OpenDatabase "ExamleDb", "scott/tiger"

'Add EMPNO as an Input/Output parameter and set its initial value.
'OraDatabase.Parameters.Add "EMPNO", 7369, ORAPARM_INPUT
  OraDatabase.AddParameter "EMPNO", 7369, ORAPARM_INPUT
'OraDatabase.Parameters("EMPNO").serverType = ORATYPE_NUMBER
  OraDatabase.SetParameterServerType "EMPNO", ORATYPE_NUMBER
'または、OraDatabase.Parameters("EMPNO").Type = adNumeric

'Add ENAME as an Output parameter and set its initial value.
'OraDatabase.Parameters.Add "ENAME", 0, ORAPARM_OUTPUT
  OraDatabase.AddParameter "ENAME", 0, ORAPARM_OUTPUT
'OraDatabase.Parameters("ENAME").serverType = ORATYPE_VARCHAR2
  OraDatabase.SetParameterServerType "ENAME", ORATYPE_VARCHAR2
'または、OraDatabase.Parameters("ENAME").Type = adVarChar
'OraDatabase.Parameters("ENAME").Size = 255

'Add SAL as an Output parameter and set its initial value.
'OraDatabase.Parameters.Add "SAL", 0, ORAPARM_OUTPUT
  OraDatabase.AddParameter "SAL", 0, ORAPARM_OUTPUT
'OraDatabase.Parameters("SAL").serverType = ORATYPE_NUMBER
  OraDatabase.SetParameterServerType "SAL", ORATYPE_NUMBER
'または、OraDatabase.Parameters("SAL").serverType = adNumeric

'Execute the Stored Procedure Employee.GetEmpName to retrieve ENAME.
' This Stored Procedure can be found in the file ORAEXAMP.SQL.
  OraDatabase.ExecuteSQL ("Begin Employee.GetEmpName (:EMPNO, :ENAME); end;")
'Display the employee number and name.

'Execute the Stored Function Employee.GetSal to retrieve SAL.
' This Stored Function can be found in the file ORAEXAMP.SQL.
  OraDatabase.ExecuteSQL ("declare SAL number(7,2); Begin" & _
           ":SAL:=Employee.GetEmpSal (:EMPNO); end;")

'Display the employee name, number and salary.
  MsgBox "Employee " & OraDatabase.Parameters("ENAME").value & ", #" & _
          OraDatabase.Parameters("EMPNO").value & ",Salary=" & _
          OraDatabase.Parameters("SAL").value

'Remove the Parameters.
'OraDatabase.Parameters.Remove "EMPNO"
'OraDatabase.Parameters.Remove "ENAME"
'OraDatabase.Parameters.Remove "SAL"
  OraDatabase.ClearParameters
End Sub
そのまま書き換えた場合に比べ、大幅に単純化されていることが分かります。

補足

  • データプロバイダに OraOLEDB でなく MSDAORA を指定しても動きます。
  • OraAdapter.ParametersADODB.Parameter のコレクションです。
    したがって、OraDatabase.Parameters("EMPNO").serverType = ORATYPE_NUMBER は、
    OraDatabase.SetParameterServerType "EMPNO", ORATYPE_NUMBER
    ではなく
    OraDatabase.Parameters("EMPNO").Type = adNumeric
    に書き換えることも可能です。
  • CreateOraDynasetOraDynaset ではなく、ADODB.Recordset を返します。
    OraDynasetRecordset の違いについては、以下の記事も参考にしてください。
  • パラメータを変更してOraDynaset.Refresh をしている場合は、
OraAdapter.RefreshParameters
OraDynaset.Requery
に書き換えてください。

2018-01-13

VB.NETとC#からのExcel出力

検索すればあちこちで見つかる VB.Net および C# からの Excel 出力ですが、意外と以下の条件を満たすものがないようですので、サンプルコードを掲載しておきます。

条件

  1. Excel 終了時にきちんと COM の開放が行われ、EXCEL.EXE が終了する。
  2. 高速化(2次元配列を使用)している。
  3. 書式設定が行われている。
  4. 遅延バインディング

参考

Excelファイルを C# と VB.NET で読み込む “正しい” 方法 - Qiita

はじめに “Excel C#” や “Excel VB.NET” でググった新人プログラマが、古い情報や間違った情報で茨の道を選ばずに済むようにと思って書きました。 この記事は、Windows で Visual Studio を使用したデスクトップアプリケーション開発を想定しています。 VB.NET でも作成可能ですが、サンプルコードでは C# 6.0 を使用しています。どちらでもいいなら C# を使いましょう。 C# または VB.NET でExcel…

サンプルコードは、Microsoft.Office.Interop.Excel を使用しています。
(リンク先では推奨されていないのですが、外部DLLを使わずにすみますので)

サンプルコード

仕様

  • DataTable の内容を新規 Book に出力し、そのまま(保存せずに)表示します。
  • String 型は文字列にしています。DateTime型は、”yyyy/mm/dd”の形式にしています。(Date 型と DateTime 型で書式を変えたい場合は文字列化した方が良いと思います。)
  • 罫線と列幅の自動調整まで行っています。
VB.NET
Option Strict Off
Imports Microsoft.VisualBasic
Imports System.Data
    Public Sub ExportExcel(ByVal dt As DataTable)
        Dim xlApp As Object = Nothing
        Dim xlBooks As Object = Nothing
        Dim xlBook As Object = Nothing
        Dim xlSheet As Object = Nothing
        Dim xlCells As Object = Nothing
        Dim xlRange As Object = Nothing
        Dim xlCellStart As Object = Nothing
        Dim xlCellEnd As Object = Nothing

        Try
            xlApp = CreateObject("Excel.Application")
            xlBooks = xlApp.Workbooks           
            xlBook = xlApp.Workbooks.Add
            xlSheet = xlBook.WorkSheets(1)
            xlCells = xlSheet.Cells

            Dim dc As DataColumn
            Dim columnData(dt.Rows.Count, 1) As Object
            Dim row As Integer = 1
            Dim col As Integer = 1

            For col = 1 To dt.Columns.Count
                row = 1
                dc = dt.Columns(col - 1)
                'ヘッダー行の出力
                xlCells(row, col).value = dc.ColumnName
                row = row + 1

                ' 列データを配列に格納
                For i As Integer = 0 To dt.Rows.Count - 1
                    columnData(i, 0) = String.Format(dt.Rows(i)(col - 1))
                Next
                xlCellStart = xlCells(row, col)
                xlCellEnd = xlCells(row + dt.Rows.Count - 1, col)
                xlRange = xlSheet.Range(xlCellStart, xlCellEnd)
                ' Excel書式設定
                Select Case Type.GetTypeCode(dc.DataType)
                    Case TypeCode.String
                        xlRange.NumberFormatLocal = "@"
                    Case TypeCode.DateTime
                        xlRange.NumberFormatLocal = "yyyy/mm/dd"
                        'Case TypeCode.Decimal
                        '    xlRange.NumberFormatLocal = "#,###"
                End Select
                xlRange.value = columnData
            Next

            xlCells.EntireColumn.AutoFit()
            xlRange = xlSheet.UsedRange
            xlRange.Borders.LineStyle = 1   'xlContinuous
            xlApp.Visible = True

        Catch
            xlApp.DisplayAlerts = False
            xlApp.Quit()
            Throw
        Finally
            If xlCellStart IsNot Nothing Then System.Runtime.InteropServices.Marshal.ReleaseComObject(xlCellStart)
            If xlCellEnd IsNot Nothing Then System.Runtime.InteropServices.Marshal.ReleaseComObject(xlCellEnd)
            If xlRange IsNot Nothing Then System.Runtime.InteropServices.Marshal.ReleaseComObject(xlRange)
            If xlCells IsNot Nothing Then System.Runtime.InteropServices.Marshal.ReleaseComObject(xlCells)
            If xlSheet IsNot Nothing Then System.Runtime.InteropServices.Marshal.ReleaseComObject(xlSheet)
            If xlBooks IsNot Nothing Then System.Runtime.InteropServices.Marshal.ReleaseComObject(xlBooks)
            If xlBook IsNot Nothing Then System.Runtime.InteropServices.Marshal.ReleaseComObject(xlBook)
            If xlApp IsNot Nothing Then System.Runtime.InteropServices.Marshal.ReleaseComObject(xlApp)

            GC.Collect()
        End Try
    End Sub
C# (4.0以上)
using System.Data;
        public void ExportExcel(DataTable dt)
        {
            dynamic xlApp = null;
            dynamic xlBooks = null;
            dynamic xlBook = null;
            dynamic xlSheet = null;
            dynamic xlCells = null;
            dynamic xlRange = null;
            dynamic xlCellStart = null;
            dynamic xlCellEnd = null;
            try
            {
                xlApp = Activator.CreateInstance(Type.GetTypeFromProgID("Excel.Application"));
                xlBooks = xlApp.Workbooks;
                xlBook = xlBooks.Add;
                xlSheet = xlBook.WorkSheets(1);
                xlCells = xlSheet.Cells;

                DataColumn dc;
                object[,] columnData = new object[dt.Rows.Count, 1];
                int row = 1;
                int col = 1;

                for (col = 1; (col <= dt.Columns.Count); col++)
                {
                    row = 1;
                    dc = dt.Columns[(col - 1)];
                    // ヘッダー行の出力
                    xlCells[row, col].value2 = dc.ColumnName;
                    row++;
                    // 列データを配列に格納
                    for (int i = 0; (i <= (dt.Rows.Count - 1)); i++)
                    {
                        columnData[i, 0] = string.Format("{0}",dt.Rows[i][(col - 1)]);
                    }

                    xlCellStart = xlCells[row, col];
                    xlCellEnd = xlCells[(row + (dt.Rows.Count - 1)), col];
                    xlRange = xlSheet.Range(xlCellStart, xlCellEnd);
                    // Excel書式設定
                    switch (Type.GetTypeCode(dc.DataType))
                    {
                        case TypeCode.String:
                            xlRange.NumberFormatLocal = "@";
                            break;
                        case TypeCode.DateTime:
                            xlRange.NumberFormatLocal = "yyyy/mm/dd";
                            break;
                        //case TypeCode.Decimal:
                        //    xlRange.NumberFormatLocal = "#,###";
                        //    break;
                    }
                    xlRange.value2 = columnData;
                }

                xlCells.EntireColumn.AutoFit();
                xlRange = xlSheet.UsedRange;
                xlRange.Borders.LineStyle = 1;  // xlContinuous
                xlApp.Visible = true;
            }
            catch
            {
                xlApp.DisplayAlerts = false;
                xlApp.Quit();
                throw;
            }
            finally
            {
                if (xlCellStart != null) System.Runtime.InteropServices.Marshal.ReleaseComObject(xlCellStart);
                if (xlCellEnd != null) System.Runtime.InteropServices.Marshal.ReleaseComObject(xlCellEnd);
                if (xlRange != null) System.Runtime.InteropServices.Marshal.ReleaseComObject(xlRange);
                if (xlCells != null) System.Runtime.InteropServices.Marshal.ReleaseComObject(xlCells);
                if (xlSheet != null) System.Runtime.InteropServices.Marshal.ReleaseComObject(xlSheet);
                if (xlBook != null) System.Runtime.InteropServices.Marshal.ReleaseComObject(xlBook);
                if (xlBooks != null) System.Runtime.InteropServices.Marshal.ReleaseComObject(xlBooks);
                if (xlApp != null) System.Runtime.InteropServices.Marshal.ReleaseComObject(xlApp);

                GC.Collect();
            }
        }

C# での注意点

  • 遅延バインディングにするため dynamic 型を使用しているので 4.0 以上が必要です。
  • Microsoft.Csharp の参照設定をしてください。

ネット上のコードで気になったこと

Workbooks の変数格納

Workbooks オブジェクトを変数に格納せず xlSheet = xlBooks.Add.WorkSheets(1); としているものも見受けられました。
c# - How do I properly clean up Excel interop objects? - Stack Overflow
試したところ、VB.NET では変数に格納しなくても EXCEL.EXE は終了しましたが、C# では終了しませんでした。サンプルコードでは VB.NET でも変数に格納するようにしています。

get_Range メソッドとRange プロパティ

Range の 取得に get_Range メソッドを使っている例がありましたが、 get_Range メソッドは MSDN

セルまたはセルの範囲を表す Microsoft.Office.Interop.Excel.Range オブジェクトを取得します。 このメソッドの代わりに Range プロパティを使用してください。

との記載があるのと、c# - Worksheet get_Range throws exception - Stack Overflow
によると、.NET4.0 からエラーになるようです。サンプルコードでは、Range プロパティを使用するようにしました。

Range.ValueRange.Value2

Excel のセルへの書き込みにValue プロパティと Value2 プロパティを使っているものがあります。両者の違いは

Value プロパティとの相違点は、Value2 プロパティでは、通貨型 (Currency) および日付型 (Date) のデータ型を使用しない点だけです。

のようです。
なぜ、二つのコードが出回っているかと言うと、VB.NET ではインテリセンスで Value が出て、C# では Value2 が出るため(Value プロパティにはパラメータがあるが、C# はパラメータ付きプロパティをサポートしていないため)で実質的な違いはないようです。
Parameterized Properties in C# and the mystery of Value2 in Excel – .NET4Office

ReleaseComObjectFinalReleaseComObject

COM の開放に FinalReleaseComObject を使っているものもありましたが、
How to properly release Excel COM objects: C# code examples によると、 FinalReleaseComObject を使うのは冗長のようですので、サンプルコードではReleaseComObject を使っています。

2018-01-09

Why "Don't track my views for this blog." does not work in Blogger

Don't track my views for this blog.
In the Blogger dashboard, when you click Stats -> Overview ->Manage tracking your own pageviews and check Don't track my views for this blog., your pageviews are expected to be excluded from the stats.
But your pageviews might be counted, and the checkbox is unchecked each time you restart the browser.

Causes

When Don't track my views for this blog. is checked, it invokes the following JavaScript setting the Cookie.

var COOKIE_NAME = '_ns';
var COOKIE_SET_VALUE = '2';
document.cookie = COOKIE_NAME + '=' + COOKIE_SET_VALUE;

But it has some issues as follows.

Domain attribute

It doesn’t specify the domain attribute, so current sub domain, blogname.blogspot.com, is set to the Cookie. If you are redirected to a country-specific URL (ccTLD), blogname.blogspot.ccTLD, the cookie is not sent because it has the different domain.(Redirect to the ccTLD has been expired. See Official Blogger Blog: It’s spring cleaning time for Blogger.)

Note: The domain attribute is supposed to be specified to apply the cookie to all sub domains under the domain. If you want the cookie for the specific sub domain like this case, you need not specify the domain attribute. And you can not specify the other domain you are requesting.

Path attribute

It doesn’t specify the path attribute, so the current page path /b is set for the path attribute. As a result, the cookie is sent only when requested pages are under /b/.

Expires attribute

As the expires attribute is also not specified, the cookie is deleted when the browser is closed (aka Session Cookie).

FYI

Workaround

The script modified the above issues is as follows.

document.cookie = "_ns=2; expires=Tue, 19 Jan 2038 03:14:07 GMT; path=/";

If you are using Chrome, after visiting your blog, start Developer Tools (press F12). Paste this script in Console and run (press Enter).

Chrome Developer Tool
(In Chrome Developer Tool, you can see and edit the Cookies at Application -> Cookies.)

  • You can’t set a cookie to never expire. So I set 03:14:07 UTC on Tuesday, 19 January 2038 for the expires attribute, the latest time avoiding the Year 2038 problem.
    I don’t use max-age attribute because IE11 doesn’t support.

If your access to your blog is redirected to blogname.blogspot.ccTLD and you want to keep Don't track my views for this blog. unchecked (which has no practical sense), execute the above script after visiting blogger’s dashboard as well.


Here is another version, which expires date is in a plain way.

var d = new Date("2038-01-19"); document.cookie = "_ns=2; expires=" + d.toGMTString() + "; path=/";

You can modify "2038-01-19" as you like (not to exceed “2038-01-19”).
If you specify the date in the past, you can delete the cookie.

Setup with Smartphones

You may want not to count the pageviews from smartphones, which browser doesn’t have Developer Tools. In such case, after visiting your blog with your smartphone’s browser, clear the address bar and type javascript: and paste the above script just after it, then press Enter.

And, if you input javascript:document.cookie; in the address bar (the last semicolon is probably not necessary), the current page’s cookie can be shown. If _ns=2 is displayed, the cookie is set properly.